Starting up with BrainAccess Board
This introductory tutorial demonstrates how to connect and stream data from BrainAccess devices using BrainAccess Board software together with its main functionality. If you haven’t done this already, download the BrainAccess Board software from the Download Centre (link). Unpack it and install it on your computer.
Connecting and Streaming
Start the BrainAccess Board and after some initialization an interactive web application will open in your browser. Follow the steps below to start streaming from the device.

- Choose the ‘Configuration’ tab and the window as shown above will appear.
- Select BrainAccess as a source.
- Press ‘Scan for devices’ and after a while, all available BrainAccess devices will appear on the list. If the expected device is not listed, check if it is turned on and not connected to another computer already.
- Select the device that you wish to connect to.
- Press ‘Connect’ and after the connection is established a device tab should appear under the ‘Connected Devices’ list. The data is now being streamed to the computer.
If you wish to stop streaming and disconnect from the device, simply press the ‘x’ button on the device tab. The Board will then disconnect from the device and the device tab will be removed from the list.
Viewing Data
After the device is successfully added to the connected device list, you can preview the data stream using BrainAccess Viewer. Press the graph button on the device tab which will open the Viewer app and will allow you to check the EEG and/or other sensor signals.

Adding More Devices
If you wish to add more BrainAccess devices simply select another device from the list and press ‘Connect’. You may need to scan again to find devices that have been freshly turned on. After successful connection, the device tab will again be added to the ‘Connected Devices’ list.
Adding LSL Streams
Other data streams can be also collected by the BrainAccess Board through Lab Streaming Layer (LSL). Select ‘Lab Streaming Layer’ as a source and a list of available LSL streams will be displayed. Choose a stream you wish to add and press ‘Connect’. The stream will then be added to ‘Connected Device’ list emulating a ‘real’ device.
It is worth noting that all the data coming from the devices and or streams are synchronized through LSL and can be recorded together using Board’s data recorder (see ‘Data Recording’ section). Therefore, these LSL streams can be used, for example, to indicate the onsets of visual, audio or other stimuli, signal user’s events such as keyboard or mouse presses, etc.
Device Template and Advanced Settings
When a certain BrainAccess device is selected from the device list a default device’s template is assigned to it. The default settings of the template can be changed in the ‘Advanced’ setup window shown below.
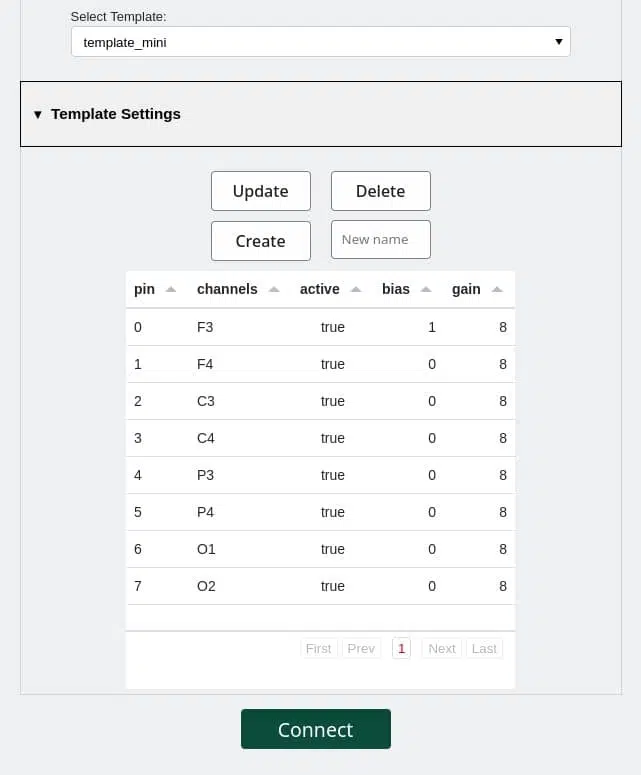
The template contains electroencephalograph channel to electrode location mapping, so if different electrode locations are used different channel labels can be assigned. The gain for each channel can be changed here as well, but care must be taken, so that the channel does not saturate if a large gain is selected. In addition, certain channels can be turned off here as well if not used.
After changing the settings the existing template can be updated or a new one created, which allows having different templates for different setups. The newly created template will appear in the template list. Next time when connecting to the device a required template can be chosen which will have all the pre-saved settings. This allows for a quick change between different experiment setups.
Important! The template settings can only be changed before connecting to the device. If you have already connected to the device, firstly disconnect from the device before changing template settings.
Data Recording
The data stream from the device can be saved to the database using ‘Data Recorder’. Enter the required details such as file location and task name in the ‘Data Recorder’ section and then press ‘Start recording’. If there is more than one connected device then all the data streams from all the listed devices will be collected and saved to the file. The data is saved in an internal format, which could be later converted to standard EEG formats such as EEGlab, MNE_fiff, etc. using the ‘File Converter’ app.
Applications
BrainAccess Board comes with various apps that can be found under the ‘Applications’ tab. Most of the apps are free to use and include useful tools such as EEG Viewer, EEG data file converter, brainwave power monitor and event-related potential visualizer. It has example apps for most BCI paradigms as well such as SSVEP and P300.
